如何使用 Python 製作文字雲
· 4 分鐘閱讀

這篇文章在教學如何使用 Python 讀取中文文檔,產生像下圖的文字雲

文字雲套件:WordCloud
這次使用的套件為 WordCloud
基本型: 英文
首先先到 CNN 截取了一段新聞,將內容存成 txt 檔,測試程式如下
from wordcloud import WordCloud, STOPWORDS
import matplotlib.pyplot as plt

# Read the whole text.
txtfile = "c:/test-wordcloud/cnn.txt" # 剛才下載存的文字檔
text = open(txtfile,"r",encoding="utf-8").read()

# Generate a word cloud image
wordcloud = WordCloud().generate(text)

# 繪圖
plt.figure()
plt.imshow(wordcloud, interpolation="bilinear")
plt.axis("off")
plt.show()
產生文字雲如下
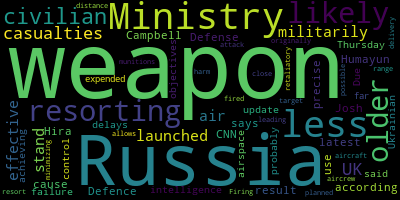
這篇文章主要在講烏俄戰爭的事,出現最多次的為 weapon 和 Russia 這兩個字,所以可以看出文字雲中這兩個字的字型最大
增加 Mask:英文
但一般的需求都是會有張底圖,所以先去網路捉了張底圖,根據官網做了些修改,測試程式如下
from wordcloud import WordCloud, STOPWORDS
import numpy as np
import matplotlib.pyplot as plt
from PIL import Image

# Read the whole text.
txtfile = "c:/test-wordcloud/cnn.txt"  # 剛才下載存的文字檔
pngfile = "c:/test-wordcloud/cloud.jpg"  # 剛才下載存的底圖
text = open(txtfile,"r",encoding="utf-8").read()
alice_mask = np.array(Image.open(pngfile))

# Generate a word cloud image
wordcloud = WordCloud(background_color="white", mask=alice_mask, contour_width=3, contour_color='steelblue').generate(text)

# 繪圖
plt.figure()
plt.imshow(wordcloud, interpolation="bilinear")
plt.axis("off")
plt.show()
其實主要只差了這一行,多加幾個參數而已
wordcloud = WordCloud(background_color="white", mask=alice_mask, contour_width=3, contour_color='steelblue').generate(text)
產生文字雲如下
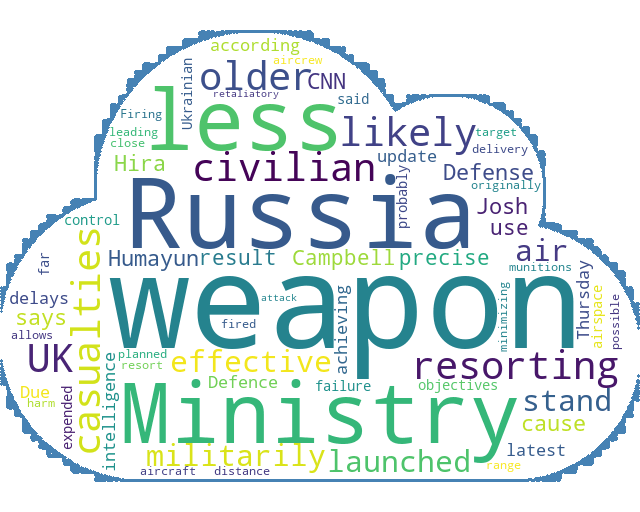
這張圖看起來就符合需求多了,但是這個程式碼只適用於英文,原因是中文有斷詞問題
中文斷詞套件:Jieba
中文斷詞套件最有名的就是 Jieba
這篇文章不打算仔細的介紹 Jieba 的原理,有空的話再整理篇獨立的文章吧
先簡單介紹使用 Jieba 產生中文文檔文字雲,需要的檔案
字典檔
非必須, Jieba 預設用的是簡體中文,如果要使用繁體中文的話,建議先去下載繁中的字典檔,斷詞效果會較好
stopwords
stopwords 指的是不希望被斷詞的字,像英文的「the」,中文的「的」之類的,這個檔可以自行編輯,但我習慣直接拿別人寫好的,
stopwords 下載點(非官方) 下載連結
字型檔
產生中文文字雲需要有中文字型,在一般 windows 的電腦都已經內建有中文字型了,只需要將路徑指向就可以,以 windows 10 來說,目錄在 c:\Windows\Fonts 下
中文文檔文字雲
這次測試的文檔是 【股票市場多少是合理的投資報酬率?實測美股大盤28年】
完整程式碼如下
from wordcloud import WordCloud, STOPWORDS
import numpy as np
import matplotlib.pyplot as plt
from PIL import Image
import jieba
import jieba.analyse
from collections import Counter # 次數統計
dictfile = "c:/test-wordcloud/dict.txt" # ��字典檔
stopfile = "c:/test-wordcloud/stopwords.txt" # stopwords
fontpath = "c:/test-wordcloud/msjh.ttc" # 字型檔
mdfile = "c:/test-wordcloud/reasonable-stock-return-spy.mdx" # 文檔
pngfile = "c:/test-wordcloud/cloud.jpg" # 剛才下載存的底圖
alice_mask = np.array(Image.open(pngfile))
jieba.set_dictionary(dictfile)
jieba.analyse.set_stop_words(stopfile)
text = open(mdfile,"r",encoding="utf-8").read()
tags = jieba.analyse.extract_tags(text, topK=25)
seg_list = jieba.lcut(text, cut_all=False)
dictionary = Counter(seg_list)
freq = {}
for ele in dictionary:
if ele in tags:
freq[ele] = dictionary[ele]
print(freq) # 計算出現的次數
wordcloud = WordCloud(background_color="white", mask=alice_mask, contour_width=3, contour_color='steelblue', font_path= fontpath).generate_from_frequencies(freq)
plt.figure()
plt.imshow(wordcloud, interpolation="bilinear")
plt.axis("off")
plt.show()
程式應該不難懂,大概要知道的就是 freq 是去計算每個詞出現的次數,依出現次數多少來決定字體大小,然後參數 topK=25 是取前 25 個值
產生的文字雲就是文章開頭那張,符合需求,任務完成
